One of the first add-ons every Elite owner should do is a tool setter. A tool setter will save time and improve your overall experience.
Without a tool setter, you can't run multi-tool NC programs. This means you'll have to create a new NC program for each tool. This is very inefficient or said another way, it's a hassle. This can cause you to order your toolpaths in a way that is optimized for the fewest tool changes rather than for the best finish on your workpiece. That would be a shame.
Maybe the software you use doesn't allow you to run multiple tools in a single NC program, perhaps due to licensing or lack of capability. Even if that's the case, there's still significant value in a tool setter.
A tool setter will significantly speed up my manual tool changes. You'll still have to turn the wrenches and swap the bits, but the machine will recalculate the Z offset for you based on its measurement of the tool against the tool setter. This is a huge time saver, even if you aren't running multiple tools in the same NC program.
There are many options for tool setters out there. I'll mention two.
First, and most straightforward, Onefinity now offers their own tool setter, the Eazy Z. This one is really plug-and-play. It also comes with a mounting bracket for the QCW, which is very convenient if you're a QCW user.
I purchased the topcom.cz DIG3D.Fix. They offer this one in a few different configurations. I chose the PNP/NC (Normal Closed) version. The PNP configuration simplifies the installation by eliminating the need to wire in a resistor. The NC configuration gives me an additional layer of protection against wiring or unit failures.
With this configuration, the Masso controller needs to see the tool setter is connected or it will alarm. This is much safer than NO (Normal Open), where it doesn't know it's connected until the tool touches the tool setter. Its white LEDs also tell me that it's connected normally. It also changes to blue when the tool touches it, giving me a nice visual confirmation.
The DIG3D.Fix offers an additional capability in that it can also measure tool diameter if that's something you find yourself needing to do.
I'd recommend the Eazy Z for anyone who wants a plug-and-play installation or a QCW, and I'd recommend the DIG3D.Fix for someone who wants maximum capability and isn't afraid of a tiny amount of wiring.
Placement is your next consideration. For QCW owners, you're probably going to mount it on the bracket on the front rail of the QCW frame. Onefinity has a great video that shows the entire installation process: https://www.youtube.com/watch?v=4yHbQxBy7FA
Otherwise, I see two good options.
If you're an ATC user, as I will soon be, you probably want to mount it along the same axis as your tool rack. The tool rack has already cost you some of your work surface, and you don't want to lose any more. I put mine just behind the home position. I chose this location to minimize the amount of time and movement required to get to a tool from the home position. I'm more often cutting toward the front of the machine than the back, and I'll place my most used tools in racks closest to the front of the machine.

If you're not an ATC user, and you're not OK to give up work surface, you can recess the tool setter into your wasteboard, such that it's entirely below the top of your wasteboard so that your workpieces can't snag it.
DIG3D.Fix Installation:
1. Turn the machine off
2. Open the touchscreen cover and run the DIG3D.Fix cable into the enclosure from the opening in the back.

3. Connect the blue wire to na open ground (GND) pin.
4. Connect the brown wire to any open power pin.
5. Connect the blue wire to any open input pin. Take note of which pin that was.
6. Close up the touchscreen cover.
7. Power the machine on.
8. Press and release E-Stop, and home like normal.
9. Load your longest tool.
10. Jog to the location directly over where your tool setter is mounted, and place the bottom of your longest tool AT LEAST 20mm above the top of the tool setter. I'm going with 40mm to be safe.

11. Write down the machine coordinates. Mine is set at X=0, Y=50, Z=-65.
12. Enter the Setup (F1) screen.
13. Enter your password, if you've set one and press enter.
14. Select Auto Tool Zero
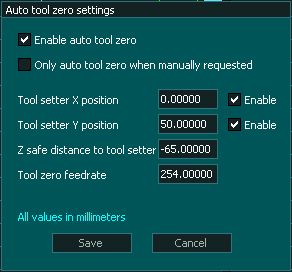
15. Select Enable auto tool zero
16. Enter the X and Y values you wrote down in step 11 in Tool setter X position and Tool setter Y position, respectively.
17. Select the Enable boxes to the right of Tool setter X position and Tool setter Y position.
18. Enter the Z value you wrote down in step 11 as the Z safe distance to tool setter. The machine will rapidly move to this Z position before slowing down for an accurate measurement. If you set this value too low, your tool will crash into your tool setter, likely damaging something.
19. Enter a reasonable Tool zero feedrate. I use 254mm/s (1in/minute).
20. Now you should be done. Let's test it.
21. Zero your Z, just as you normally would.
22. Select PROGRAM & MDI (F2)
23. Select MDI (CTRL+M)
24. Enter tXXm6, where XX is the number of the next tool you want to load, and press Run.
25. Load the new tool.
26. Press Cycle Start (CTRL+S)
27. The machine should jog to the tool setter's location and touch the tool off on the tool setter.
28. Now let's confirm that the new tool is zeroed correctly. Jog over to the surface you zeroed on before. Slowly jog your Z down until you are within about 5mm above that surface. Check the Z ZERO position on your touch screen. It should be about 5mm.
You're all set. You're one step closer to tricking your CNC out.
If you're manually changing tools, now is also a good time to set your tool change location. After doing this, the machine will automatically move to a predefined position that gives you easy access for tool changes. You might even want this to be directly above the tool setter.
Tool change location setup:
1. Jog to the position you'd like the spindle to be in when you're changing tools.

2. Write down the machine coordinates of this location.
3. Press SETUP (F1)
4. Select Tool Changer
5. Select Manual Change
6. Check all three enable boxes.
7. Enter 0 in Z Axis
9. Enter the values you wrote down for X and Y machine coordinates in step 2 in X Axis and Y Axis, respectively.
9. Press Save.
You're done! Awesome!
References:
Onefinity Easy-Z: https://www.onefinitycnc.com/product-page/onefinity-tool-setter
Topcom.cz DIG3D.Fix: https://uglydogwoodshop.com/products/pre-order-topcom-cz-dig3d-fix-toolsetter-diameter-sensor
Masso Tool Setter Documentation: https://docs.masso.com.au/wiring-and-setup/touch-plate
Masso Manual Tool Changer Documentation: https://docs.masso.com.au/wiring-and-setup/tool-changers/mill-tool-changers/manual-tool-changer