You certainly can achieve good results without a Pendant, but the locational freedom and tactile nature of the pendant sure make zeroing a lot easier.
When you zero with just the touchscreen, you have to divert your eyes from the tool and workpiece, which could crash if you're not careful, to the touchscreen. Because you can't feel the buttons on the touchscreen, you need to visually confirm you're fingers are touching the buttons. But you're eyes can't focus in two places at once. So, you've got to switch back and forth between the two.
With a pendant, you can focus completely on the tool and workpiece. Your hands can feel the controls, so there's no need to look at them. This is a more comfortable and safer way to zero your workpieces.
Consider the locational freedom you have with the pendant versus what you have with the touchscreen alone. With the touchscreen, you have to be right in front of it to jog the machine. With the pendant, you can physically move around the machine while holding the pendant, and jog from any physical position. I use this, especially when zeroing on the rotary, but it's a nice capability for whatever need to jog from a different position, such as when cleaning the ball screws.
Installation Steps:
1. Power the machine off.
2. Remove the plastic shell from the 15-pin DIN connector. It will get in the way of closing the door of the G3 Touch if it's not removed.
3. Run the 15-pin connector through the back opening in the G3 Touch housing, from the rear, and plug it into its corresponding female connector on the upper-right of the G3 Touch.
4. Secure the cable to other cables with zip ties for strain relief.
5. To make the E-Stop on the pendant work, move the black wire from EStop 2 to pin EStop.
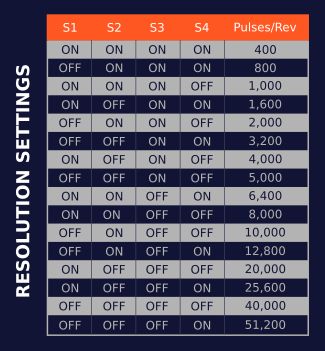
6. The X and Y will not jog properly (or at all) when on the X1 setting as the resolution setting is too coarse by default. To correct this, you need to change the X, Y, and B motors to use at least 800 PPR (Pulses Per Revolution).
I recommend 4000 so that you get a nicer surface finish on your workpieces. That's unrelated to the pendant installation, but you might as well do it while you have the motor housings open.
7. First, grab a small Phillips screwdriver and remove the two screws that hold the motor housing on.
8. Per the reference image set:
S1: ON
S2: OFF
S3: ON
S4: OFF
9. Re-install the housing and its two screws.
10. Repeat steps 7-9 for the other two motors.
11. Now, power the machine back on.
12. Press and release E-Stop like normal.
13. Press F1 (Setup), enter your password if you've set one, and press ENTER.
14. Tap the Axis Settings
15. Tap X-Axis

16. Set the Drive: Pulses per revolution to 4000.
17. Tap Save
18. Repeat steps 15-17 for the Y and B axes.
You're done. It should be working correctly, and you should get a little better quality out of your machine to boot. You're one step closer to tricking out your CNC.
Here's some useful links to relevant documentation and forums:
Masso MPG Pendant Setup: https://docs.masso.com.au/wiring-and-setup/setup-and-calibration/mpg-pendant
Masso Motor Setup: https://docs.masso.com.au/wiring-and-setup/setup-and-calibration/axis-servo-stepper-examples/masso-stepper
Masso E-Stop Wiring: https://docs.masso.com.au/wiring-and-setup/setup-and-calibration/e-stop
Masso Axis Settings: https://docs.masso.com.au/masso-settings/axis-settings
Onefinity FAQ on Masso Forums: https://forums.masso.com.au/threads/onefinity-elite-faqs.3291/post-24139